Single Sided Lightbox LED Upgrade
£0.00
all price are exluding VAT
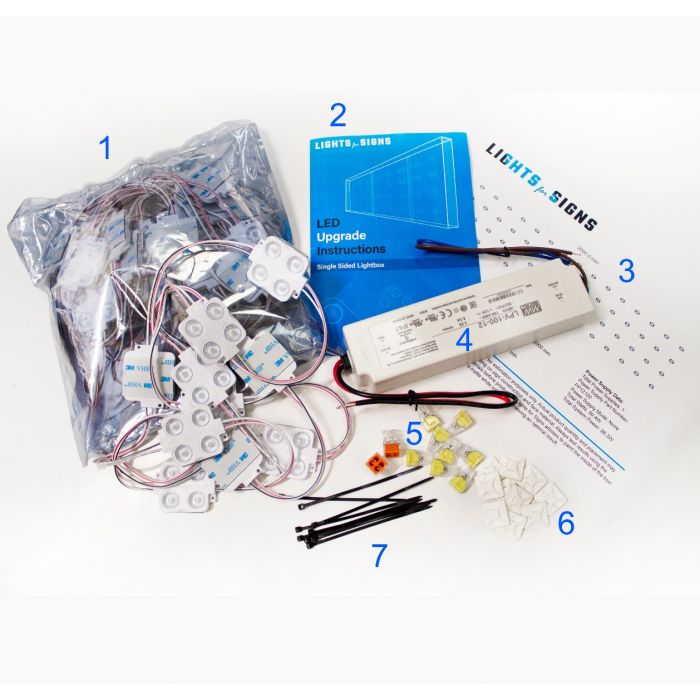
Whats included:
- LED Modules - Quantity is determined by the size of your sign.
- Upgrade Instructions
- LED Module layout diagram
- Driver/s to sufficently power all LEDs
- Connectors
- Cable ties
Step 1 - Order Kit
- Enter your lightbox sign dimensions here (length, height and depth) to get the complete Kit price of everything you need, including layout & instructions.
- Delivery should be within 48 hours of your order.
Step 2 - Check the kit & read the instructions
Step 3 - Clear out the old stuff
- Ensure the electrical power is turned off.
- Take off one of the side frames and carefully slide out the Acrylic front panel.
- Disconnect the mains supply to the electrical gear trays.
- Remove the old fluorescent tubes (being careful not to break them). They need to be disposed of acording to the WEEE Directive regulations, generally at your Local Council Recycling Centre.
- Cut out all the wires & remove the Electrical Gear Trays and any other clips & fittings, leaving the inside of the case bare & clean.
- Hint: We recommend painting the inside of the lightbox with matt white for optimal results.
Step 4 - Set out the new LED modules & drivers
- It's important that the modules stick to a clean dry surface, so clean the back of the sign with Methylated Spirit or Isopropanol Alcohol.
- Hint: We often recommend that you cut a piece of white faced ACM to fit into the back of the lightbox, and you can then layout the modules on the bench – which makes life easier.
- Mark out where the modules are to go acording to the layout supplied in the kit, taking care to make sure they are all evenly spaced.
- Fix the Driver(s) to the back panel and connect the low voltage wires, paying particular attention to the wire colours, Red is positive (+ red stripe) - whilst Black is negative (- black stripe).
- Connecting them the wrong way round will not work - and may cause damage, - which is not covered by our warranty.
- When you are satisfied that everything has been connected on the low voltage side of the driver, you can connect the original mains supply to the brown & blue wires on the driver – and then test. Finally, clip any loose wires back with the cable ties and self adhesive bases supplied.
Step 5 – Replace the front panel.

Shipping costs
- Delivery charges vary based on the product, size and delivery address.
- For an accurate delivery charge, please enter the delivery postcode in the cart or at the checkout.
Shipping processing time
- All orders for stock items are generally processed within 1-2 days working days.
- Orders for special colours or more bespoke items will take longer. We usually have these processed within 10 days working days, but it may take longer depending on the specifications.
- If you have a particular delivery deadline, please call the office on 0800 0418593 to discuss your needs.
- If we are experiencing a high volume of orders, shipments may be delayed. Please allow additional time for your delivery. If there will be a significant delay in any shipment of your order, we will contact you via email or telephone.
Shipment Confirmation & Order Tracking
- As soon as your order is packed & ready for the courier, we will email your invoice with the Carrier & Tracking Information.
Deliveries
- All deliveries must be examined - before being signed for.
- Any damage or shortage must be noted with your signature and to us within 24 hours, otherwise the carriers will deny responsibility, and we will be unable to make a claim on your behalf.